This post is all about my years making 100% whole wheat bread. This is the very best whole wheat bread recipe. After years of trial and error I have found the best, both to eat and to make. It’s simple and my tricks are REALLY going to help you! We love it for sandwiches or on its own!

We are over 7 years into my bread journey. I started making it after my last baby because I knew I’d have some spare time while she was napping. I wanted to make something that
1) My family would enjoy.
2) Would save us money.
3) Was healthy.
Seven years later and I really enjoy doing it. Our house smells amazing and my family and friends love it! Making bread from scratch can be a really rewarding process. Let’s go!
Making whole wheat bread at Home
When I started making whole wheat bread the recipe that I found worked best was from Deals to Meals (which I was initially using to save money on groceries — it’s an awesome service!), but through trial and error I have made some adjustments to make it work better for myself. That recipe was a great foundation though!
Mixing Whole Wheat Bread

Basically, I am lazy — so I use a mixer. 🙂
**Update: Since I wrote this post I have gotten a Bosch. Learn about Bosch mixer Vs Kitchenaid << right there.
I used to use my 6 qt professional KitchenAid mixer (you can also get a refurb KitchenAid cheaper on Amazon), and I have tailored this recipe to work in the KitchenAid.
However, I was burning out the motor from the very beginning.
Kitchenaid mixers are NOT good at mixing 100% whole wheat bread.
I always had to add some white flour to get it to keep mixing and make the process easier. Which, I found super frustrating.
SO, I got a Bosch Universal Mixer. It can do 4 (or more) full 100% whole wheat bread loaves really easily. The motor doesn’t seem phased at all.
If you plan to do 100% whole wheat bread — I recommend the Bosch I love my Bosch, I love it so much more for bread — be sure to check out my post about Bosch vs Kitchen Aid to pick the mixer that will work best for you. Also, check out my best Bosch tip (I always thought I’d love it best for bread, but it turns out that I love it even more for batters and cookies).
💐 Bosch Mother’s Day Sale! 💐
The Bosch Universal Mixer was $499 → now $429 with code PULLINGCURLS
The BLACK/Stainless mixer) was $579 → now $509 with code PULLINGCURLS
Other specials include:
☑️ 25% OFF Sourdough Items & Kitchen Accessories
☑️ 25% OFF Select Attachments
☑️ NEW! Wheat Variety Bundle: Live Now
There have also been some re-stocks of fan favorites: See all the specials here!
100 Percent Whole Wheat
It’s much more economical to grind your own wheat. You can also learn about all the amazing nutritional benefits of processing the wheat yourself. I decided it was the right plan for us and I’m glad. I haven’t ever looked back.
This video will show the process from beginning to end:
My Wheat Grinder
I do grind my own wheat. I use wheat berries. I personally get them from the LDS cannery (which you do not have to be LDS to shop at — this blog explains more about how it works) — but you can get them easily on Amazon.
I use a Nutrimill classic grinder — seven years ago when I bought it was the best I could find for the price I could afford. Grinding by hand was something I had considered, but I am SO grateful I have this grinder. It’s a workhorse!
Recently, Nutrimill sent me the Harvest mill — I compare the two here: Grain Mills: Which one is best?
You can buy them here:
Best Whole Wheat Bread Recipe
First off, I get my tap running, I use the hottest tap water we have for the recipe. If you have a tiny water heater and only have lukewarm water, this probably won’t work for you — but it does work for me. The water should be steaming, if you don’t see steam, it’s probably not hot enough (or, it’s Arizona in the summer, as it’s hard to tell if it’s your skin or your water that is steaming).
This receipe makes 4 loaves of bread.
Obtain 5 cups of steaming hot water.
Pour it into your mixer bowl. That’s right, water first (this prevents the flour from sticking too much to the bottom of the bowl and being difficult to mix in later)
Then, I dump in 2/3 cup vital wheat gluten (I was just buying the kind from Walmart for a while, but recently a friend gave me a can from Honeyville and I think it’s made my bread THAT much yummier. I will be purchasing it from them all the time now). You can also grab gluten from Amazon.
Dump in 2.5 T instant yeast (I get mine at Costco, it looks like loaf yeast but it’s actually the little grains, just with all the air removed).
Dump in 7 cups of whole wheat flour. Mine I usually freshly ground in my Nutri-mill. Do it all at once, it will still work.
I mix that for one minute, by then it should all be mixed in with maybe a few small patches of flour on the edges (but not much).
 Then, it sits like a little bandit on my counter covered with a cloth for 10 minutes.
This technique is called sponging and from what I read it’s extra great for freshly ground whole wheat flour to soak in all that liquid.
During this time, I grab all the ingredients for the next step — the sugar, salt, oil and lemon juice. I usually also throw in a load of laundry and sometimes grease my pans.
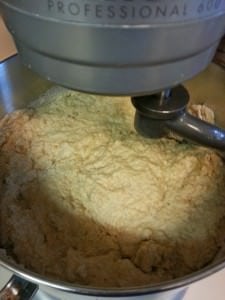 After the 10 minutes (a timer comes in REALLY handy during the bread making process), you pull off the cover and you’ll see this. The flour, yeast, and gluten mixture will have risen a bit and look all gooey.
Then, it’s time to dump in your sugar (I use brown sugar instead of honey, I heard it freezes better and I think it’s easier to use than honey. I have tried both and I didn’t notice a difference), lemon juice, salt, and oil. Mix that all up for about a minute (until it looks pretty well combined). You may still have a few clumps of brown sugar, that’s alright, it will mix in with the rest of the stuff.

I often pre-measure this and have it waiting in a bowl nearby. I have a really hard time counting out cups of flour while parenting, so if there’s a quiet moment during the 10 minute sponging I try to do this then. I use 1 cup of whole wheat flour and 4 cups of all-purpose, just because this seems to be the mixture that makes it so my mixer doesn’t stop part-way through it. I do this for the KitchenAid – if using a Bosch you can use all whole wheat flour.
**Mixing up whole wheat flour is a lot harder then mixing up regular flour in your mixer, so be sure to check your manual to see how much you can put in. I experimented, and this is what worked for me (again, mostly only important if you have a Kitchenaid)
With my Kitchenaid I 2/3 this recipe, to make sure it can make it through. Just FYI.
I dump in those 5 cups, one at a time (using the mixing collar, the mixer runs the whole time). Make sure that the flour gets pretty well incorporated between each dump. The total mixing time in here, for me, is usually around 8 minutes. But, it can go as high as 10.
I was actually watching America’s Test Kitchen the other day when they said that you don’t really have to worry about over-mixing bread. I always had a worry in the back of my head that I would over-mix it and it would be bad. I worry less now and my bread is coming out better.
Here are two things I watch for when I am making bread dough:
- It usually takes about 2-3 minutes once all the flour is mixed in.
- You will notice the bread is mixed and looks fairly smooth, but a little grainy — don’t stop mixing it at this point, it will be better if you keep going until it looks REALLY smooth. Honestly, like a baby’s bottom. If in question, keep going a minute more. A lot of bread making is experimenting. You can do it!
Sometimes my mixer (KitchenAid) peters out before the bread is done — in which case I hand knead it for a bit. It makes me feel all Ma Ingalls and appreciate my mixer more
**Most modern KitchenAid’s seem to be equipped with a stop function when it is getting overheated. Mine has always re-started after this, but I try not to get it to this point. Sometimes I smell a little burning and I’ll just stop and hand knead it. If yours stops, let it cool down for about 1/2 an hour and you can try again. However, if you are close to the end, I’d just pull the dough out and finish kneading it on your own.
While the mixer is finishing I usually grab and grease my bread pans. I recently bought four 88 cent pans from Walmart and they cook well and are going strong. I only cook this type of bread in them, I don’t wash them, and they have done fine. I don’t see a need for fancy pans here.
Sometimes during the mixing I set my oven to heat to 350 for 2 minutes. My oven will allow me to only heat it for those 2 minutes, so maybe see if yours can. It makes it easy in case you get distracted, your oven doesn’t get too warm.
I take my dough scraper and pull the dough out of the bowl. I use the straight side to cut into four fairly even loaves. Often, they’re not as even as I’d like — but what can I do? I certainly can’t lose sleep over it. I form each one into a loaf, mostly turning the bottom into the middle (using my fingers — does that make sense?). I plop it into the pre-greased pans (I just use Pam). Then, I push it all down until it is fairly even in the pans, otherwise you end up with HUGE slices in the middle, and sad ones on the end — and no kid wants that.
Then, into the warm oven they go. The recipe says it should take 10-15 minutes to rise to the top of the pans, but mine takes a bit longer, closer to 30 minutes. Then, I cook them at 350 for about 40 minutes. I have had some raw bread in the middle and that’s REALLY no good. 40 minutes tended to be my oven’s sweet spot.
Once they’re done I pull them out of the oven. I use a plastic knife (the kid kind from Ikea) to go along the edge so you don’t end up with clumps of bread left in the pan (and you don’t cut into the pans with a sharp knife), I dump them onto wire racks and let them cool for about 3 hours. Then, I put them in sacks (I buy these sacks on Amazon because I think they fit loaves the best) and we’re done! Easy peasy, right?
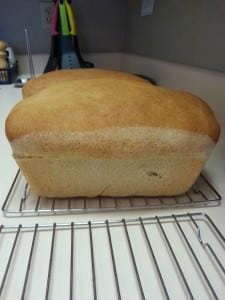
These are my loaves here, are they perfect in every way? No, but they are homemade — I know where all the ingredients came from and that’s more then I can say for perfectly shaped loaves from the store. That’s good enough for me.
Here’s the printable recipe! (Use print friendly to print it easily).
Or, get it sent to your inbox:
Pull Your Bread, Not your Curls Bread Recipe
Makes 4 loaves
(if your mixer is smaller then 6 qt, you will need to reduce)
Add 5 cups steaming hot water in your mixer bowl
then add:
7 cups whole wheat flour
2/3 cup Vital wheat gluten
2.5 T instant yeast
Mix for 1 minute on speed 2
Allow to sponge for 10 minutes covered.
💐 Bosch Mother’s Day Sale! 💐
The Bosch Universal Mixer was $499 → now $429 with code PULLINGCURLS
The BLACK/Stainless mixer) was $579 → now $509 with code PULLINGCURLS
Other specials include:
☑️ 25% OFF Sourdough Items & Kitchen Accessories
☑️ 25% OFF Select Attachments
☑️ NEW! Wheat Variety Bundle: Live Now
There have also been some re-stocks of fan favorites: See all the specials here!
Then, mix in 2T salt
2/3 cup oil
1 cup sugar
2.5 Tablespoons lemon juice (bottled is fine)
mix for 1 minute on speed 2 (until combined)
Then add, a cup at a time (mixing well in between each addition)
5 cups of flour (determine the mixture that works best for you — mine is 1 cup whole wheat, 4 cups all purpose).
**So, in total you will have used 12 cups of flour — 7 before sponging, and 5 after, you can use whatever ratio of whole wheat to white you think your mixer can tolerate (now that I use the Bosch, I use 100% whole wheat — but it WILL KILL your Kitchenaid at this size recipe).
Allow to mix until it looks REALLY smooth. This will take 8-10 minutes from when you started adding the salt etc. all on speed 2.
Pre-heat oven to a low temp for 1-2 minutes and turn off.
Divide dough into 4 loaves, press evenly into the corners so you get a more even loaf.
Place in the warm oven for 30-ish minutes (until the dough reaches the top of the pans). Then, turn the oven on to 350 and bake for 35-40 minutes.
Pull out and place on wire racks to cool.

If you’re into bread — check out my post on bread hacks, and my other post about making a LOT of bread at once.
This post was originally published in 2013, but has been updated.






Carebear says
I am excited to try this recipe but I don’t have a mixer and would mix and knead the dough by hand. Would you please give the instructions on how to do that with your recipe? THANK YOU!
Hilary says
I’d mix the first part (at least through the sponging) with a hand mixer. Then I’d just mix it as good as I could with a wooden spoon and then take it out and knead it for about 8 minutes, or until it’s smooth. I’d also be very tired. I do it by hand once a year with my kids and they always leave me by the end. 🙂
Aly says
I have been making bread for over 40 years and still have a stinker once in a while, just often enough to keep me humble. Great tips, I wish more people would make their own bread, so much more flavor and a third of the cost of buying bread..
Hilary says
I’m on bread making hiatus this summer. It’s SO hot in Phoenix, I’d rather just eat bad bread than have my house heated up any more!
Aly says
Not me, I try to make the dough the night before refrigerate and form and bake the next morning. Had friends over for lunch today and we enjoyed freshly baked brioche rolls, yum. (just rubbing it in a tad) If you have room in the freezer foccacia, rich white bread, brioche, freezes well.
Hilary says
Jealous! Our car read 127 the other day…. bread’s out for a bit here!