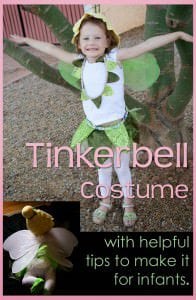
 There is one key to magic for little girls.And that is sparkle.
There is one thing that DOESN’T say magic to a seamstress (and I would use the word seamstress pretty lightly about myself).
And that is sparkle.
So I compromised with this costume.
When I made a Tinkerbell costume for my 4 year old I knew that I wanted a few things:
1) I wanted her to be happy with it. There’s no reason to sew a costume your kid isn’t going to love.
2) I wanted it to be easy to get on and off on her own. We own a ton of dress-ups and I HATE having to help her get them all on and off.
3) It was for Halloween, so I wanted it to be able to go with varying temperatures.
4) I wanted it to be appropriate for a 4 year old. As Princess P will tell you, we are modest around here and we don’t show our shoulders. It’s a big deal, and hence the seemingly WAY too adult Tinkerbell costumes just would not do.
5) I needed to limit my swear words while making the costume to less then 5% of my vocabulary, hence it couldn’t be too hard.
Soo….
We looked at a lot of Pixie images, and one of the things we both liked the most was that they used things from nature in their clothing. Tink’s skirt is made of leaves, so we wanted to preserve that. I knew the skirt was the place we needed to start, so off we went to Joann’s. We picked out a darker green crushed velvet, and a sparkly green. Yay! Those looked like a LOT OF FUN TO SEW ON.
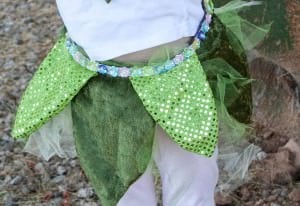
1) First, cut out “leaves” from each fabric. I measured around her waist and then divided that number by 6 or 7. My plan was to overlap the leaves, but not to have them so big that it woudln’t “splay” out right. I measured from her waist to her knee and that was our length (I made the darker green ones about an inch longer then the sparkly ones). I sewed those right sides together to make leaves (and then turned it so the sewing was on the inside). It would be possible to do this without sewing that way, but the fabrics I chose were pretty flimzy and I wanted it to look OK if it flipped up. If you didn’t want to sew these together, you’d need to use a no-fray on the crushed velvet. **Sewing on that sparkly fabric is just about as easy as sewing through your own hand. It’s actually just glued on sparkles, which gums up your needle. I had read a few tutorials that mentioned wiping your needle off with nail polish remover every few inches — I did that, and I still had to use about 4 needles because it did gum up. All in the name of sparkle!

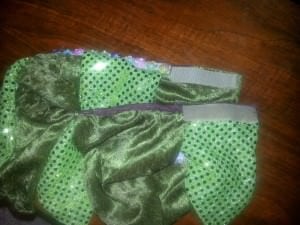 |
| Here is a close-up of the skirt. You can see the Velcro closure, and also how the “leaves” are sandwiched in the bias tape and sewn. Then, the flower trim is tacked on top |
3) We also found that cute flower trim at Joann’s, and I had to hand stitch it on– on top of the bias tape. There is no sewing those suckers. Just took stitches in between each flower with transparent thread.
4) Underneath it I made very small tulle skirt of varying lengths of tulle. It is on its own elastic, so it can be worth with it, or without it. We didn’t want it very full but she did want some and that type of skirt is very easy to adjust to however you want it. I let her be the guide.
*I do think there is something exciting and special about letting your child help you design their costume, I do love that time together, it almost makes up for the sparkly fabric. Ok, maybe not.
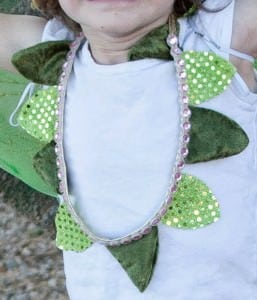 5) On top, for her “necklace” I couldn’t sew another moment on that sparkly stuff, so I used some fabric glue to make smaller petals (I just cut paper until it looked like about the right size — holding it up to her chest, as sometimes it’s hard to really picture this stuff in your head). I used a toothpick to smear the fabric glue in between two petals and then let it dry. I found it easier to sew the crushed velvet together so I just did that. I sewed it into bias tape (and I had EXTRA glue this time, YAY!). I made it really long, and a full circle, so she could just pop it over her head. i hand sewed on the little jewel trim which I also found at Joann’s, I actually REALLY liked this stuff. It had solid construction, I would use it again.
We added a t-shirt, some wings, leggings and a smile!
Now, I made this same costume for P when she was a tiny baby. My main concern was for her comfort back then, here are a few thoughts for adjusting it for a baby:
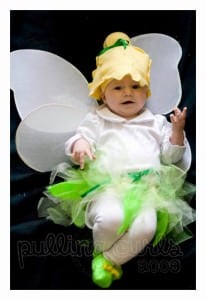
1. Use a onsie (I found this cute peter pan collar at a Goodwill, but just make sure it’s appropriate for the weather).
2. I just made a very small tulle skirt. I did sew some felt “petals” onto the elastic as I made the tulle skirt — it’s kind of hard to see them, I’m not sure that part was worth it. I also added some ribbon. Those tulle skirts sure are easy to adjust to however you need them!
3. I saw this hat idea on the internet and tried to replicate. I just took a baby hat that we already had and covered it in trangular strips of yellow fleece (tacking the fleece to the hat in a few spots) and then hot glued a styrofoam ball covered in the fleece to the top, and tied a little bow around it like Tink’s bun. The hat was a little sketchy, but it looked great for pictures. I actually used it in our pictures this year (I cut it off the baby hat) and then left it at home. I wish I could’ve figured out a better way to make it, but it did the trick for what we needed.
4. I made her some little shoes (which were surprisingly easy) — I honestly felt like they made the outfit! I sewed little ribbons on the top, or you could sew a pom-pom.
5. Wings were only for pictures. I mean, she’s a baby. 🙂
Anyway, I think Tinkerbell is a fun thing for a little girl to be. It is a land of fantasy, and Tinkerbell does a lot of good things, but also has a bit of mischief inside of her. Reminds me of a little girl I know. With the new
Tinkerbell movie called The Pirate Fairy will be available on Blu-ray and Digital HD April 1. I bet lots of girls will want to be Tinkerbell. I hope someone finds this helpful!


OneMommy says
So adorable!
Thanks for the tip of wiping off the needle with alcohol…. Never would have thought about it!